ProFile Planner Help
If you have a problem not solved in Help, you can:
Order support: Kaplan customer service 1-800-334-2014, or via email at [email protected]
To create a ticket in our automated suppport system, email [email protected]
ProFile Planner Help is available Monday-Friday from 9:00am-5:00pm EST at 1-855-202-6429.
Using this Guide
Logging In
Home screen
Calendar Screen
Lesson Planning
Other Search Results
Connections
Messages
Reports
Settings
Contact Us
Using this Guide
This user's guide provides instructions for how to navigate through ProFile Planner and unlock its full planning potential. For specific answers to your questions, click on the link at the top of the page to read about a topic. If you need further assistance please call our support staff at 1-855-202-6429. Our offices are open Monday through Friday 8:00 am – 5:30 pm EST.
Logging In
To access ProFile Planner visit www.profileplanner.com or click the link found at www.kaplanco.com/profileplanner. If you are already a registered user, enter your username and password to start planning.
Individual subscribers create a username and password as part of the initial subscription.
School/Organization subscribers are provided a username and password by the administrator of the ProFile Planner account.
Unregistered Users
- Click the "Sign up for a 30-Day trial!" tab at the top of the sign in screen.
- Complete the required fields to create an account and a personalized username and password.
- Click the "Create new account" button at the bottom of the page.
Forgotten Password
- Click the "Forgot your password" link below the password field if the password is lost or forgotten.
- Enter the registered username or e-mail address and complete the CAPTCHA.
- Click “E-mail new password” to have a new temporary password sent.
- The temporary password link will only work once. If the link is clicked more than once, then repeat the steps for the “Forgot your password” process.
First Time Signing In
After the first sign in, a quick start guide appears to share a brief overview of using ProFile Planner and making lesson plans. Click the Home icon to view the Home Screen.
Home Screen
With the exception of the first time signing in, the Home Screen is the default view once a user has signed into the planner. This screen displays a list of the day’s current activities if activities have been entered.
- Click the link in the day planner or click the Calendar icon at the top of the screen to schedule an activity on the Calendar Screen if no activities are scheduled.
- Click the Home icon located at the top left of the screen to return to this view after navigating away from the Home Screen.
Calendar Screen
The Calendar Screen provides a view for adding or reviewing activities in the planner. The activities can be viewed by day, week or month.
- The calendar defaults to a monthly view, but will remember the last calendar view used. To change views, click "day," "week" or "month" at the top of the calendar or choose the forward or backward arrows at the top right of the screen.
- The Calendar view is also displayed in increments of 5, 15, 30 or 60 minutes at a time. To change the time increment, click “5,” "15," "30" or "60" at the top of the calendar.
- To return to the current day, click the "today" button to the left of the forward and backward arrows.
- To select a specific date, click the “Go to Date” button located at the top right of the Calendar Screen.
- To view or print a PDF version of the calendar, click the “Adobe PDF” button at the top right of the Calendar Screen.
Lesson Planning
Search
The keyword Search Menu is located on the right side of the Calendar Screen. To search by keyword, do the following:
- Type a word or phrase into the blank search field at the top of the Search Menu.
- Click the “Magnifying Glass” or press Enter to launch a search for activities related to the term.
- Search results are categorized by the book where they are found.
- Search results can be sorted by book or center. To sort by center click the ”Light bulb” button at the top of the Search Menu.
Advanced Search
The Advanced Search allows users to find specific results. Any text criteria remaining in the Search Menu will automatically transfer into the Advanced Search as a “Quick Search.” This criterion can be further refined by specifying additional search requirements using the following steps.
- To access the Advanced Search, click the "+" button under the keyword search field.
- In the first drop down field select which area or field to search. Then choose whether to include or exclude specific words, age groups, materials, etc.
- To add another requirement for the search, click the "+" button at the end of the first line and additional blank fields for search criteria appear.
- After submitting the search, a new page appears with results fulfilling the criteria.
- To view more information or add it to the calendar, add the activity link.
Activities
Preloaded activities in ProFile Planner come from lesson planning activity books compiled in a database for easy access and searching. Activities relevant to a search appear under the search field on the right side of the page.
- To see an overview of the activity, click the activity title to view the activity name, source, age group, interaction type, primary topic and learning center.
- To view a PDF of the activity as it appears in a print book, click the “View PDF” icon at the bottom of the description.
There are two ways to add activities to the planner. One option is to manually add activities that are not part of the planner database. The primary way to add activities is to search the activity database and drag them to the calendar.
- To create a new activity or manually enter an activity into ProFile Planner, click a blank area on the Calendar Screen and a blank activity screen appears to be completed.
OR
Click the Settings icon, Planner Management > Activities and click Add an Activity. - Complete the fields in the form, and the activity appears under My Activities.
- To add an activity to the calendar, select the activity, and drag and drop the “Drag me to the Calendar” icon onto the Calendar Screen and enter the following information.
- Select the date, start and end times, recurrence of the activity and the associated routine and/or learning center.
- Review and edit the activity tabs found at the bottom of the screen as needed.
| Tab | Description |
| Instructions | Detailed instructions for doing the activity. These instructions can be modified. To keep any modifications, click the “Save” button at the bottom of the screen. Any activities that have modifications are automatically saved under the My Activities heading in the activities list.
|
| Materials | A complete list of materials needed for the activity. This list can be modified. A list of books and songs related to the activity may be found as well. This tab also provides a field to store hyperlinks to music or other web based activities. |
| Objectives | A list of key objectives associated with the activity. These objectives can edited or may need to be added depending on the activity. |
| Standards | A list of standards that are mapped to most activities in ProFile Planner. This option provides the user a way of tracking the standards taught as well as selecting or editing standards for an activity. The standards recommended for an activity are indicated by a check box. To select the recommended standard:
|
| Children | If children or groups have been added to a roster, the names appear to the right of the activity information. Select the names of the children or groups to assign them to an activity.
|
| More | General information about the activity that can be modified. |
- Click “Save” to keep any changes and add the activity to the calendar.
- Click “View PDF” to see the PDF instructions.
Editing Existing Activities
- Once an activity has occurred, the activity options change when the activity is opened.
- Click “Journal Entries” to view or add a journal entry.
- Click “Add a Journal Entry.”
- Complete the Subject and Notes sections.
- Check Share this note and file with child’s connections to make the Journal Entry available to anyone added as a connection. Choose to upload a file that supports the Journal Entry if needed.
- If this option is not checked, the Journal Entry is only available to the teacher and those who have the classroom access to see the Journal Entry.
- To add an entry for a specific child, check the box beside the child's name.
- Journal entries for each child are available in Reports.
- While activities occurring the past cannot be edited or deleted, Journal Entries can be added to activities in the past.
- To delete an activity scheduled on the current day or anytime in the future, click the activity to open the activity details and click “Delete” at the bottom of the screen.
- Activities occurring before the current date CANNOT BE DELETED.
Other Search Results
My Activities
Any ProFile Planner activity edited by a user or any activity that has been manually added to the planner appears under My Activities for future use.
- The “*” beside an activity link is notification that the activity has been modified in some way.
My Music
Music that has been purchased and downloaded appears under My Music for future use.
- Instructions for purchasing are found in the iShop section.
Topics
Topics refer to themes a teacher might assign to a day or week’s activities. They typically appear at the top of the schedule in the all-day area on user-specified days. Topics can also be assigned to specific time slots on the calendar as a placeholder for activities.
- If Activities are expanded, it is difficult to see the Topics heading. Topics are found under My Music in the Search Menu.
- To assign a topic, go to Topics and click the topic title to open the topic. Drag and drop the topic to the top of the Calendar Screen to the all-day area to assign a theme for the day(s) or to a time slot on the calendar as a placeholder.
- Enter the topic details in the window that appears.
- Topics can also be assigned on the “More” tab found on the Add an Activity Screen.
Music
The Music heading found in the lower Search Menu displays all songs associated with a search term.
- To see general information about the song, click the song title to view the Title, Artist and Album.
- To hear a 20 second sample of the song, click the "Play Song" at the bottom of the description.
- To purchase the song, click the “Purchase” at the bottom of the screen.
- Each song can be downloaded to a computer or external device up to 10 times. Purchased songs appear under My Music in the lower Search Menu.
iActive Learning iShop
All music titles found in the ProFile Planner lower search results are available at the iActive Learning iShop found at https://iactivelearning.com/?q=shop.
The iActive iShop is an extensive electronic mall of resources for early childhood educators and families of young learners. iActive’s powerful search engine presents thousands resources ranging from eBooks to music, apps and videos that have been carefully screened and selected by education experts who understand how children learn.
- To purchase an item, click “Add to cart.”
- Click the Shopping Cart icon at the top of the screen to advance.
- Review the items in the cart and click “Checkout.”
- Click “Log in.”
- The ProFile Planner username and password DOES NOT give a user access to an iShop account. The user must create an iShop account to purchase materials.
- To create an iActive iShop account, click “Create new account” tab.
- Enter the new account information.
- The new account information can be the same as the ProFile Planner account information.
- Click the “Create New Account” at the bottom of the screen.
- The account registration process is not complete until the password is set by clicking the link in the Account details email sent after creating a new account in the previous step.
- Navigate to https://www.iactivelearning.com, click “Sign in” and enter the new user name and password and click “Log in”.
- Click the “Shopping cart” link to view the items ready for purchase.
- Click “Checkout” and complete the payment information.
- Click “Review order” and review the purchase information.
- Click “Submit order” to complete the transaction.
- The purchased item with instructions for access appears with the completed purchase.
- Purchased music appears under the My Music tab and can be downloaded to different devices up to 10 times.
Digital Portfolio
The Portfolio icon is found next to the Calendar icon on the toolbar. Portfolios are a standard for documenting student progress, and communicating with family members. They often contain work samples, teacher observations, and student reports.
A digital portfolio provides several advantages over a simple folder, the most important being ease of use. Digital photos and videos are now the norm. Pictures of students work and footage of students performance can be instantly available for both teachers and families. A digital portfolio ensures privacy allowing a teacher to easily choose what they wish to share with families. Finally a digital portfolio does an excellent job of facilitating family communication allowing parents to monitor their student's progress as often as they wish.
Recording Journal Entries
There are two ways to record journal entries.
- From the activity itself click the "Journal" button. This will associate the journal entry with the activity.
- From the portfolio.
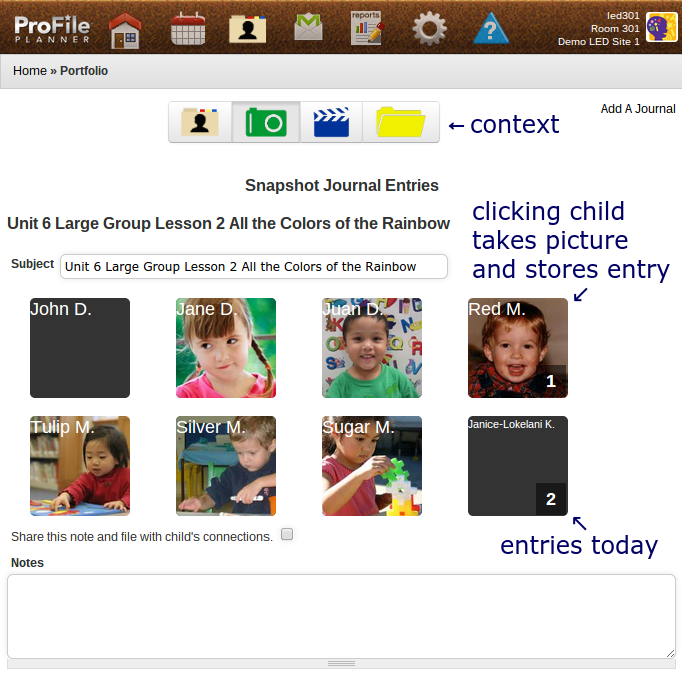
There are two types of add journal forms.
- "Add A Journal" allows a single entry to be associated with multiple children. For example a group project.
- "Snapshot Journal Entries" allows for quickly adding several separate journal entries for each child. The context button group allows for selecting a child's portfolio, taking pictures, capturing video, and attaching files.
Recording Progress
Recording Progress When an activity has defined objectives and a progress scale has been established for the site or classroom a progress button will show with the activity. The progress form allows for easily tracking each student's progress. Various reports will allow tracking progress. When the same objective is used in multiple activities the cumulative reports will group these together.
There are several progress scales to choose from. A custom scale may also be added for your site or classroom. If a progress scale has already been determined for your site, you may not be able to modify it and will need to see your school site administrator.
This form allows for notes, and a link to the source document. Grouped Scale Entries are exclusive of each other. Grouped Scale Entries should be ordered from top to bottom least proficient to most proficient. Important: changing a progress scale won't change progress entries in the past, and can lead to confusion when reading reports and comparing past entries to future entries. It is best to either choose a progress scale or set up a custom progress scale once and then leave in place.
Connections
Connections are now found under the Settings Icon or Cog. Connections provide a way to connect administrators, coworkers, family members, and volunteers to a specific classroom. The Connections table displays a list of all of connections associated with a classroom.
- Click “Add Family” at the top left of the Connections Screen, complete required fields to connect a family member to a specific child in the classroom.
- Family members may be linked to multiple children and classrooms. A family Connection must be linked to a child in order to see any information when signing into ProFile Planner.
- Click “Add Teacher/Other” at the top left of the Connections Screen to connect administrators, coworkers, and volunteers to the classroom. Select the appropriate classroom and assign an access level to each individual added.
- Access Levels are explained under Connections.
- Click “Save” at the bottom of the screen to keep the changes.
Messages
The Messages icon is located on the toolbar beside the Portfolio icon. Messages
enable teachers, parents, administrators, and/or volunteers to communicate in a secure environment.
- The sender or recipient of any message must be set up as a Connection to send and receive messages.
- To compose a new message, click the “Write new message” link at the top left of the screen.
- The Inbox tab displays all incoming messages.
- The Sent Messages tab displays a list of all sent messages.
- The All Messages tab displays a list of all incoming and outgoing messages.
- Select a “Child or Connection” from the list of names on the left and the email addresses for the respective connection are displayed in the “To” field.
- Complete the Subject, Message text and click “Send message.”
Note for Parents
Messages sent to a Parent Connection in the ProFile Planner will not be delivered directly to the parent’s email address, but an email will be sent to the personal email to notify the user that a message was delivered to the Message Center in the ProFile Planner.
If the parent does not have a ProFile Planner account, the parent will receive an email alert to create the account. Once the account is created, parents can log into the planner to send and receive messages with the classroom teacher and administrators.
Reports
The Reports icon is found next to the Messages icon on the toolbar. Information is pulled from Activities to populate reports. They can be generated to provide a list of needed Materials for activities, Child History, Class History, Daily Routines, State Standards, Covered State Standards, Detailed Daily List, Family View, Book List, and Learning Centers.
Child History
Child History provides a record of all routines, activities, and standards assigned to a selected child. This report is very useful parent/teacher conferences, and it also clearly labels shared and private journal entries. Click the "Child History" link.
- Select a child from the drop-down menu.
- Select the desired report view by clicking the button for day, week, or month.
- Dates can be changed to review reports from an earlier period by clicking the “Calendar” button at the top of the screen or choosing the forward or backward arrows at the top right of the screen.
- Click the “Adobe PDF” button beside the “Calendar” button to create a printable PDF version of Child’s History.
Class History
A Class History report is a teacher report that shows all routines, activities, and standards assigned to each child or class.
- Click the “Class History” link.
- Select the desired report view by clicking the button for day, week or month.
- Dates can be changed to reflect an earlier reporting period by clicking the “Calendar” button at the top of the screen or choosing the forward or backward arrows at the top right of the screen.
- Click the “Adobe PDF” button beside the “Calendar” button to create a printable PDF version of Class History.
Family View
Like the Child History, the Family View displays all information visible to a specific family connection in addition to a record of all routines and activities associated with a specific family. It is useful for parent teacher conferences, classroom activity communication including journal entries shared by the teacher.
- This view also allows a teacher to verify that parents see the correct information about a child.
- Click the “Family View” link.
- Select the family member from the drop-down menu.
- Select the desired report view by clicking the button for day, week, or month.
- To select a different date range, click the “Calendar” button or choose the forward or backward arrows at the top right of the screen.
- The activities and information available to view are dictated by the teacher.
- Click the “Adobe PDF” button beside the “Calendar” button to create a printable PDF version of Family View.
Materials List
The Materials list is a list of needed materials for the activities assigned to a lesson plan.
- Click the “Materials list” link.
- Choose to display the materials list in a daily or weekly view by clicking the button for day or week.
- To select a different date range, click the “Calendar” button or choose the forward or backward arrows at the top right.
- Click the “Adobe PDF” button beside the “Calendar” button to create a printable PDF version of the Materials List.
Book List
The Book List presents a list of recommended reading materials that support the activities found in the lesson plan.Click the “Book List” link.
- Select the desired list view by clicking the button for day, week, or month
- To select a different date range, click the “Calendar” button at the top of the screen or choose the forward or backward arrows at the top right.
- Click the “Adobe PDF” button icon beside the “Calendar” button to create a printable PDF version of the Book List.
Daily Routines
The Daily Routines report shows a list of routines added to the planner by day, week or month. This report is helpful when planning lessons.
- Click the “Daily Routines” link.
- Select the desired report view by clicking the button for day, week, or month
- To select a different date range, click the “Calendar” button at the top of the screen or choose the forward or backward arrows at the top right.
- Click the “Adobe PDF” button beside the “Calendar” button to create a printable PDF version of the Daily Routines.
Learning Centers
This report provides a list of the Learning Centers and the activities associated with them in the lesson plan. It is another helpful planning tool.
- Click the “Learning Center” link.
- Select the desired report view by clicking the button for day, week, or month
- To select a different date range, click the “Calendar” button at the top of the screen or choose the forward or backward arrows at the top right.
- Click the “Adobe PDF” button beside the “Calendar” button to create a printable PDF version of the Learning Centers.
State Standards
A calendar view of all lesson plan activities, state standards and objectives assigned to them.
- Click the “State Standards” link.
- Select the desired report view by clicking the button for day, week, or month
- To select a different date range, click the “Calendar” button at the top of the screen or choose the forward or backward arrows at the top right.
- Click the “Adobe PDF” button beside the “Calendar” button to create a printable PDF version of the State Standards associated with the lesson plans.
Covered State Standards
A report that lists all state standards covered in a classroom by a given date. Not all standards need the same emphasis with a particular group of students. This report is not intended to “score” any given standard, but help the teachers to find the areas they still need to cover for a given period of time.
- Click the “Covered State Standards” link.
- Select the standard to view from the Select State drop-down menu.
- Select the desired report view time frame by scrolling to bottom of the page and selecting the desired Start and End date.
- The covered state standards are indicated in the far left column.
- Click a standard to execute an Advanced Search. The Activities that meet the search criteria for the specific standard are listed in a table format.
Detailed Daily List
A detailed list of all instructions, materials, books, standards, and objectives found in a day’s activities.
- Click the “Detailed Daily List” link.
- To select a different day, click the “Calendar” button at the top of the screen or choose the forward or backward arrows at the top right.
- Click the “Adobe PDF” button beside the “Calendar” button to create a printable PDF version of the State Standards associated with the lesson plans.
Settings
The Settings icon is found next to the Reports icon on the toolbar. Settings include my User Login, Classroom(s), Connections, Children, Groups, Planner Management, and Widgets.
My User Login
The User Login is a multi-tab view that provides a summary of the user’s information.
- The View tab displays contact information and length of membership.
- Bookmarks are available for the user to store and access helpful website bookmarks.
- The Edit tab allows the user to edit account information including password changes.
- The Weather tab gives the user the ability to configure weather settings for a specific location.
Sites*
For administrators who manage multiple sites or teachers who teach at more than one site, the Sites Screen is available under the Settings icon. The Sites Screen displays a table of all sites connected to an account.
- Sites can also be accessed from the site link found in the top right of the screen.
- Click "Add Site" in the top left of the Site Screen to add another site.
- Click “Edit” in the third column to change the name of the site.
- Click “Classroom” in the third column to add a classroom to the site or edit a classroom’s information.
- Click “Roster” in the third column to add or remove children from a classroom associated with a particular site.
- Click “Set Current” in the third column to select the desired site to view.
*All accounts do not have multiple sites, so this option may not be available under the Settings icon.
Classrooms
The Classroom Screen displays a table of all classrooms set up on the account. The table provides the classroom name(s) and school year. It also gives the user the ability to edit the classroom information and view the classroom roster.
The child must be added before the name will appear as a student to add to the roster.
- Click “Add a Classroom” in the top left of the Classroom Screen to add a new classroom and select the appropriate age group and standards for the new classroom.
- Click “Edit” in the third column to assign the School Year, Age Groups, and Standards for a specific classroom.
- Click "Roster" in the third column of the table to display a list of children assigned to the classroom.
- Click “Save” at the bottom of the screen to keep the changes.
- Click “Set Current” in the third column to select the desired classroom to view.
Connections
Connections provide a way to connect administrators, coworkers, family members, and volunteers to a specific classroom. The Connections table displays a list of all of people associated with a classroom.
- Click “Add Family” at the top left of the Connections Screen to connect a family member to a specific child in the classroom.
- The family member must be linked to a child to see any classroom information. A connection must be added first in order to link a child to the connection.
- Click “Add Teacher/Other” at the top left of the Connections Screen to connect administrators, coworkers, and specialists to the classroom.
- The classroom and access level must be assigned for each individual added. Select one of the following Access Levels:
- Shared Owner of Class gives the new connection the same access to the classroom tools as the teacher.
- View and Update All Class Items gives the connection the ability to see all aspects of the classroom and to add activities and update lesson plans only.
- View All Class Items allows the connection to view all activities and settings for the classroom, but nothing can be edited or added.
- Volunteer is not an access level but a label that gives the teacher the ability to contact connections who have volunteered to help. These connections have no ability to see any classroom information; unless, they are family connections as well.
- Click “Save” at the bottom of the screen to keep the changes.
Children
The Children setting allows a user to add, edit, or remove a child and their data from a classroom. A table lists all children in the classroom with their Picture, First and Last name, Birth Date, Gender and Status.
- Click "Add a Child" at the top left of the Children Screen. Complete the appropriate fields and click "Save" at the bottom to save the child to the classroom, or "Cancel" to go back without saving.
- The added child appears in the table on the Children Screen.
- Many sites have a common roster where every child is initially added. To assign a child from the site to a classroom, go to the Classroom Screen
- Children added to a classroom are available to be added to activities or groups, record histories, appear on the roster, etc.
- Click "Edit" or "Delete" in the seventh column of the table to edit a child's information or delete a child from the classroom.
- Removing a child from a classroom does not delete a child’s history.
Groups
The Groups setting displays a table of all groups set up on the account. It also provides information such as Identification, Group Name and the Classroom with which the group is associated.
- Click "Add a Group" at the top left of the Groups Screen to add the group name and create the group.
- Click "Edit" in the second column of the table to change the group name and click save.
- Click "Delete" in the second column of the table to delete the group.
- Click “Roster” in the second column of the table and click “Add” in the row of the student to be added to the group.
Widgets
Widgets allow users to enhance lesson planning experience by installing add-ons. The Widgets setting displays a table of all widgets set up on an account.
- Click “Add a Widget” at the top left of the Widgets Screen to add a widget.
- In the Add a Widget Screen, choose to make the widget active, select the Widget type, and enter a name, description, and URL.
- Click Save and the added widget appears in the table on the Widgets Screen.
- Google Calendar widgets in XML format can be added. If an organization has a Google calendar which is publicly available, then add the XML sharing address for it to the planner. Google Help has information about sharing. A list of publicly-available calendars of interest is located here. A sample Google Calendar XML feed that may be useful is the US Public Holidays Feed: http://www.google.com/calendar/feeds/en.usa%23holiday%40group.v.calendar.google.com/public/basic
Planner Management
Planner Management is designed to help the user set up and maintain activities, routines, learning centers, topics, and journal entries related to lesson plans.
Activities
The Activities link provides a table of activities on a user’s calendar and/or activities added into ProFile Planner. The table includes the activity name, days assigned, start and end time, first and last date and links to “Show” and “Journals.”
- Click "Add an Activity" at the top left, to add a personal activity to the table. Complete the applicable fields and click "Save" at the bottom of the page to save the activity in the planning database. See Activities for more details.
- Click “Show” in the seventh column of the table to view activity details found in the tabs associated with the activity (routine, learning center, instructions, materials, books, music, etc.).
- Click “Journal Entries” at the top left of the Activity Screen to show journal entries from the activity.
- Click “View PDF” at the top left of the Activity Screen to open and review the PDF instructions provided with the activity.
- Click “Journals” in the seventh column of the table to display journal entries recorded for that activity.
- Journal entries can be added to an activity by clicking “Add a Journal Entry.”
Routines
Routines are allotments of time, generally consistent on the calendar with a set schedule. Activities can be assigned to a color-coded routine to help visually identify what subject or event is taking place. A list of preloaded routines is available on the Planner Management page under Routines.
- Click "Edit" or "Delete" in the fifth column of the table to edit or delete preexisting routine.
- Click "Add a Routine" at the top left of the page to add a new routine.
- Routines can be set up concurrently, allowing multiple routines to occur simultaneously, or in a specific sequence if a time constraint is not applied. From the drop down menu, select a color to color-code routines for personalization and quick schedule review.
- After adding a new routine, it appears in the table.
Learning Centers
Learning Centers provide a way to assign specific areas of the classroom or teaching space to an activity. An extensive list of learning centers is preloaded and appears in a table on the Learning Centers page.
- Click "*" is saved, the new learning center appears in the table, as well as in drop down menus where other learning centers appear.
Topics
If following a specific theme, or participating in an all-day event, set up topics for the day or week. Added topics appear on the user-specified days at the top of the schedule in the all-day area. A list of preloaded topics is available on the Planner Management page under Topics.
- Click "Add a Topic" at the top left of the Topics Screen to add a topic to the list. Topics added from this menu appear under My Topics in the lower Search Menu.
- To view added topics, click on the topic under My Topics. Preloaded ProFile Planner topics are found under the Topics heading.
- An added Topic or ProFile Planner Topic can be added by dragging the topic to a selected date.
- Upon releasing the mouse a topics window appears, enter the appropriate Topic information, and select preferences.
- Click "Save" at the bottom of the screen to save the topic to a day or multiple days.
- To proceed without making changes click "Cancel."
- To remove the topic from the schedule click "Delete."
- Clicking “Delete” will not permanently remove the topic from ProFile Planner.
Journal Entries
Journal entries are intended to help document observations or serve as notes on activities.
- Click an activity name on the calendar to view the "Edit Activity" screen.
- Click "Journal Entries" at the top of the New Journal Entry Screen and click “Add a Journal Entry.”
Contact Us
Help Desk:
ProFile Planner Help is available Monday-Friday from 9:00am-5:00pm EST at 1-855-202-6429. Questions and comments can also be emailed to [email protected].
Sales:
ProFile Planner Sales Department is available Monday-Friday from 8:00am-5:30pm EST at 800-202-6429. Sales information can also be accessed any time at www.kaplanco.com/profileplanner.